How to Use Apple’s Parental Controls on iPhone, iPad, and Mac

Last updated:5月 29, 2023
Ask a child or teenager which phone or tablet they want, and nine times out of 10 they’ll say iPhone or iPad. Youngsters like iPhones and iPads. Maybe it’s the smooth graphics, or the simplicity of the OS, or just the fact that everyone in school has one. Whatever the reason, Apple has positioned itself as the top mobile device choice for kids and teenagers.
As parents, that actually works in our favor. Apple knows what it’s doing when it comes to protecting users’ privacy and digital well-being. That includes offering a robust set of resources for controlling how our kids use their devices so we can better protect them.
But how do we set up those parental controls? Where do we even begin? Let this be every parent’s guide to setting up iPhone and iPad parental controls.

Parent’s Apple ID or New Apple ID?
Whether you bought your youngster a new Apple device or upgraded yours and gave them the old one, the first step is to set up the Apple ID. But here’s where most folks get confused: Should they use their Apple ID to sign in or create a new one for their child? For the purpose of setting up parental controls, the most ideal route is to create a new Apple ID for the child but only through the Family Sharing feature. Apple’s terms of use actually don’t permit children under 13 to create an Apple ID for themselves,1 so the parent or guardian has to set it up. For verification, the parent must set up Family Sharing through a device logged in with their own Apple ID. Don’t worry, we’ve outlined how to do this with step-by-step instructions below.
How to create a child account for iOS
Parental control settings aren’t device-specific. Instead, you create an Apple ID for your child you can manage from any Apple device. Once you create the account, you can use Quick Start to set up a new iPhone or iPad with your preferred parental controls already in place.
Here’s how to create a new child account from your iPhone, iPad, or Mac:

Step 1: Tap or click on Settings.
Step 2: Tap or click on Family.
Step 3: Tap or click on the blue Add Member button.
Step 4: Tap Create Child Account.
Step 5: Enter the child’s name, birthday, and then tap or click on Verify You’re an Adult.

Step 6: Tap or click on the Continue With [security] popup to give parental consent. In our case, we used Face ID.
Step 7: Tap or click on Agree or Disagree for Apple’s Family Privacy Disclosure and its Terms and Conditions.
Step 8: Tap Continue to confirm the child’s new email address.
Step 9: Tap or click on the popup to verify the address.
Step 10: Create a password for the child’s new Apple ID.
Step 11: Choose a phone number to receive verification codes.
That’s it. You can use this Apple ID on any iPhone, iPad, or Mac you choose. Now, let’s take a deep, deep dive into the fathomless parental controls.
iPhone Parental Controls: A Brief Overview
You can manage your kids and monitor their activity by tapping or tapping this path on your iPhone, iPad or Mac:
But before you start, you must enable Screen Time on your child's account before you can manage content and permissions.
How to enable Screen Time
First, tap or click on the following path to reach the Screen Time settings:
Settings > Family > Your Child’s Name > Screen Time

Step 1: Tap or click on Turn On Screen Time.
Step 2: A new screen appears, explaining all the available tools. Tap or click on Turn On Screen Time again.
Step 3: Tap or click on the slider to set the child’s age (5–18). The default settings adjust accordingly.
Step 4: Tap on a category to customize the content restrictions for Apps, Books, TV Shows, Movies, and more.
Step 5: Tap or click on Turn On Restrictions when you’re done. Alternatively, tap or click on Set Up Later to customize the restrictions some other time.
Step 6: Tap or click on Turn on Communication Safety to protect your child from sensitive photos displayed in the Messages app. Alternatively, you can tap or click on Set Up Later.

Step 7: Select a Start and End time period and then tap or click on Turn On Downtime. Alternatively, you can tap or click on Set Up Later if you need a customized Downtime schedule for your child.
Step 8: Set the daily time limits for your child’s apps. You can choose all apps and categories, select a specific category, or select apps individually.
Step 9: Tap or click on Set to define the Time Amount, and then tap or click on Set App Limit. Alternatively, you can tap or click on Set Up Later.
Step 10: Create a Screen Time passcode.
Step 11: Enter the Screen Time passcode again to complete the setup.
That’s it. Your child’s account is ready. If at any point you selected Set Up Later or need to adjust the settings, read on to find out how.
How to set your child’s downtime
Downtime is ideal when you want to block access to an Apple device during bedtime. Children receive a five-minute warning before downtime kicks in, allowing them to request more time if needed. Some apps and phone calls you choose elsewhere in the Screen Time controls will bypass the downtime restriction.
First, follow this path:
Settings > Family > Your Child’s Name > Screen Time

Step 1: Tap or click on Downtime.
Step 2: Enter your Screen Time PIN.
Step 3: Tap the Scheduled toggle to enable Downtime (green).
Step 4: Tap Every Day and select the start and end times, or select Customize Days and set specific times for each day.
Step 5: Tap the Block at Downtime toggle if you want to lock the device during Downtime. However, the child can ask for more time.
Keep in mind Downtime applies only once per day—you cannot schedule multiple Downtimes within a single day. If you need more than one block of time scheduled, use the parental controls in your router or gateway to block internet access for a specific time, like during homework hours.
How to set app limits
You can set daily time limits for any app installed on the child’s device. Tap on a category to limit all related apps or tap on a specific app. There’s an option to limit access to all installed apps too.
First, follow this path:
Settings > Family > Your Child’s Name > Screen Time

Step 1: Tap or click on App Limits.
Step 2: Tap or click on Add Limit.
Step 3: Tap or click on All Apps & Categories to set limits on all apps your child uses. Alternatively, tap or click on the circle next to a category (like Social) to select all social apps, or tap on a category to choose a specific app (like Discord).
Step 4: Tap or click on Next.
Step 5: Select the amount of time your child can use the app(s) each day. Alternatively, tap or click on Customize Days to set different time limits each day.
Step 6: Tap or click on Add to complete.
How to set communication limits
The limits you set apply to Phone, Messages, FaceTime, and iCloud contacts. Here you can restrict communication to Contacts Only, Contacts & Groups with at Least One Contact, or
Everyone. To get started, follow this path:
Settings > Family > Your Child’s Name > Screen Time

Step 1: Tap or click on Communication Limits.
Step 2: Tap or click on During Screen Time to restrict who your child can communicate with during normal hours.
Step 3: Tap or click on During Downtime to restrict who your child can communicate with during Downtime hours. If you select Specific Contacts, a popup appears for you to select an existing contact or create a new one.
Step 4: Slide the Manage Child’s Contacts toggle into the On position to manage contacts remotely. A popup appears for you to select an existing contact or create a new one.
How to set communication safety
This setting only applies to the Messages app, which detects nude photos before they’re received and seen by your child. To toggle this setting on, follow this path:
Settings > Family > Your Child’s > Screen Time

Step 1: Tap or click on Communication Safety.
Step 2: Tap or click on the toggle next to Check for Sensitive Photos. It turns green when you enable this setting.
Step 3: Tap or click on the toggle next to Improve Communications Safety if you want to help Apple improve this tool (optional).
How to set Always Allowed apps and contacts
You can allow your child to use specific apps at all times and who your child can contact during Downtime. To change these settings, follow this path:
Settings > Family > Your Child > Screen Time

Step 1: Tap or click on Always Allowed.
Step 2: Tap or click on Contacts to select Everyone or Specific Contacts. If you choose the latter, a popup appears for you to select an existing contact or create a new one.
Step 3: Tap or click on any red “minus” icon to remove an app from the Allowed Apps list. Phone, Messages, FaceTime, and Maps are Always Allowed by default.
Step 4: Tap or click on any green “plus” icon to add an app to the Allowed Apps list.
How to modify iTunes & App Store purchases
Here you can control what apps your child installs and deletes. You can also allow or block in-app purchases.

Step 1: Tap or click on iTunes & App Store Purchases.
Step 2: Tap or click on Installing Apps to Allow or Don’t Allow.
Step 3: Tap or click on Deleting Apps to Allow or Don’t Allow.
Step 4: Tap or click on In-App Purchases to Allow or Don’t Allow.
Step 5: Tap or click on Always Require or Don’t Require. If you select Don’t Require, your child isn’t prompted to enter a password again after the first purchase.
Step 6: Tap or click on Done when you’re finished.
How to set Content Restrictions
This section provides all the settings you need to restrict movies, TV shows, websites, Siri results, and Game Center activity.

Step 1: Tap or click on Content Restrictions.
Step 2: The following screen breaks down into four cards and their individual settings:
Allowed Store Content
Music, Podcasts, News, Fitness – Clean or Explicit
Music Videos – Off or On
Music Profiles – Off or On
Movies – Don’t Allow, Not Rated, from G to NC-17, Unrated, Allow All
TV Shows – Don’t Allow, from TV-Y to TV-MA, Allow All
Books – Clean or Explicit
Apps – Don’t Allow, from 4+ to 17+, Allow All
App Clips – Allow or Don’t Allow
Web Content—Select one of three
Unrestricted
Limit Adult Websites – Tap the Add Website link for Always Allow or Never Allow to enable and block specific adult-oriented websites.
Allowed Websites – Tap the Add Website link to add a website to the preselected list of nine (Disney, PBS Kids, National Geographic Kids, etc).
Siri
Web Search Content – Allow or Don’t Allow
Explicit Language – Allow or Don’t Allow
Game Center
Multiplayer Games – Don’t Allow, Allow With Friends Only, or Allow with Everyone
Adding Friends – Allow or Don’t Allow
Connect with Friends – Allow or Don’t Allow
Screen Recording – Allow or Don’t Allow
Nearby Multiplayer – Allow or Don’t Allow
Private Messaging – Allow or Don’t Allow
Profile Privacy Changes – Allow or Don’t Allow
Avatar & Nickname Changes – Allow or Don’t Allow
Other restrictions
Finally, on the Content & Privacy Restrictions screen, you can set restrictions to Allow or Don’t Allow for the following settings:
Share My Location
Passcode Changes
Account Changes
Cellular Data Changes
Driving Focus
TV Provider
Background App Activities
Apple offers parents an incredible set of tools for free. As we've shown, you can block access to your kids' Apple devices overnight, limit the content they consume, limit app usage, and more overnight.
If you ask me, is there a more worry-free, convenient way to monitor someone's mobile phone without the other party's knowledge? Yes, use SpyX spyware free tool for parental control. Using iCloud credentials, spyx can hack into a child's iCloud account and access phone data without his knowledge.
Pros of Using SpyX
1. Undetected
SpyX is hidden and undetected. If you use SpyX to track someone’s phone, you will never worry about being caught. It works in stealth mode. And the target user will not know you are tracking the phone. You login to SpyX dashboard to view data of target phone anonymously.
2. Compatible with All iOS Devices
SpyX is designed for everyone who has demand of tracking someone’s phone remotely. So, SpyX is compatible with all iOS devices. You don’t worry about phone compatibility any more.
3. No Jailbreaking or Rooting
Once you complete 3 steps, you can start remote tracking with SpyX. Jail-breaking or rooting is not required. Because SpyX is use-friendly. And you can operate SpyX smoothly even your are not technician.
4. Safe and Secure
SpyX is 100% safe and secure. And SpyX company will not leak the data of target phone to other platforms or other people. So you don’t worry about the safety of your data or that of your target.
5. Accurate Real-time Location
SpyX enables you to track target’s live location via a map as well as location history. You can know where the target user is and where he has visited recently.
6. Affordable Price
SpyX provides a dozen of tracking features with affordable price. That means you can enjoy robust phone number tracker with reasonable budget. How great SpyX is! Why not choose SpyX now? It is stronger than you imagine.
1. Use SpyX to monitor someone's iphone activity
Operating SpyX is very easy.
Step 1. Sign up Free
Before start monitoring, create a free SpyX account using your valid email.
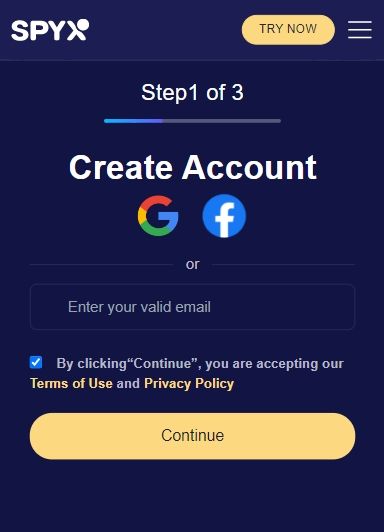
Step 2. Purchase suitable plan.

Step 3. Connect Target Phone with SpyX
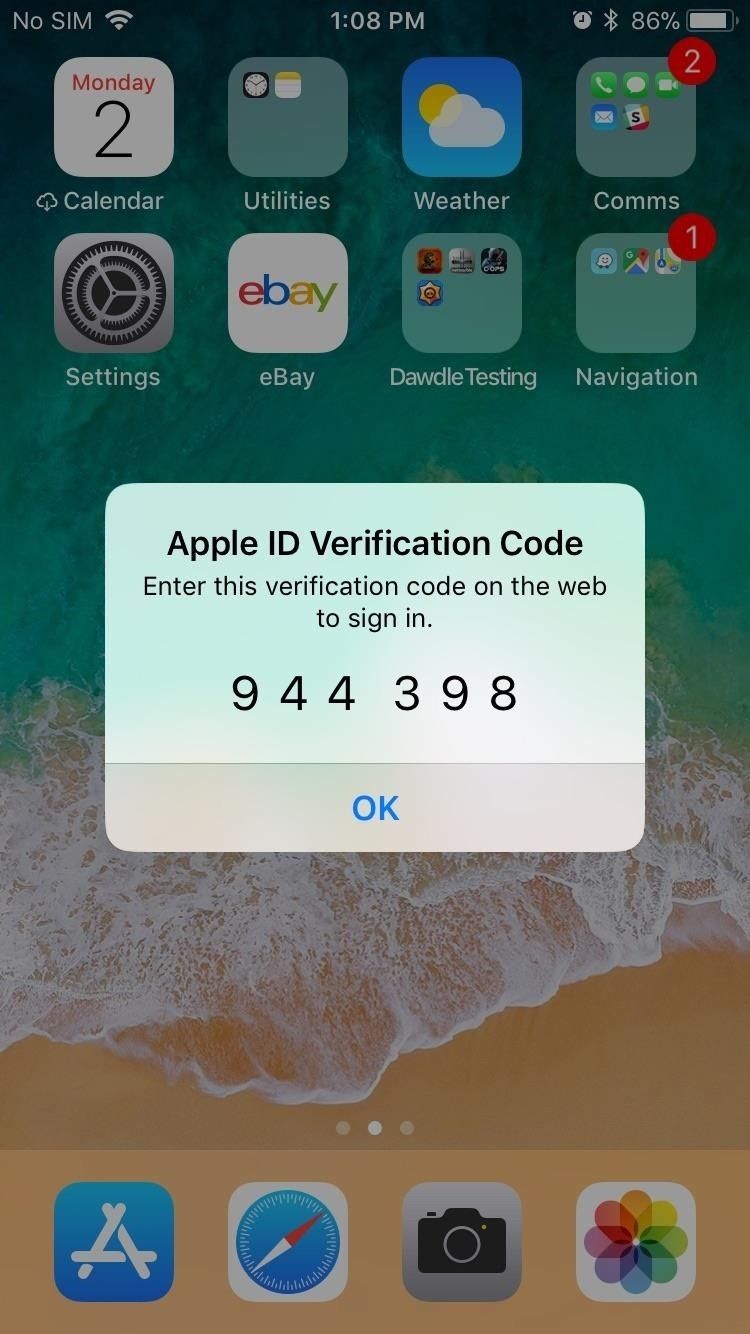
Set up SpyX and login to the iCloud account using the target device’s iCloud ID and password.
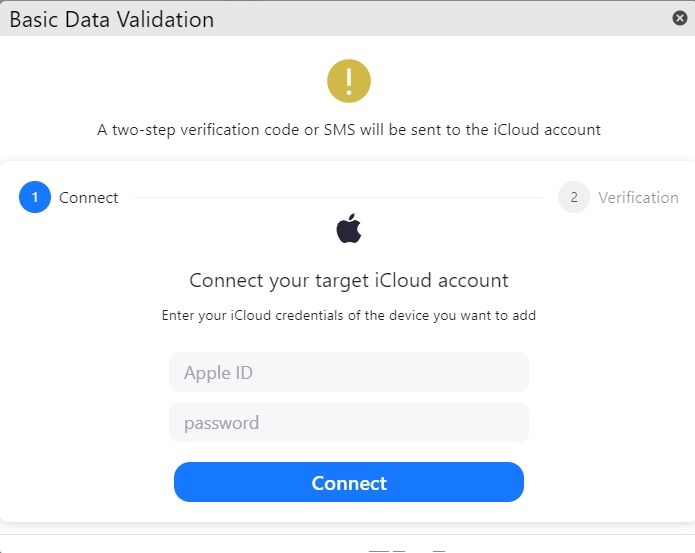
After verifying the icloud account, enter the verification code received by the target device.
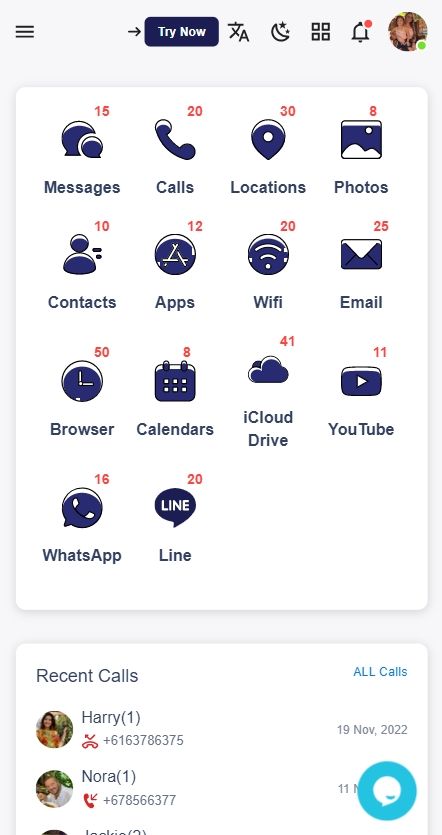
Step 4. Start Monitoring
Start viewing the activity information of the target device from the SpyX control panel.
A Final Call: Stay Vigilant
But kids are smart, especially young teens and older kids, and they are more resistant to the way you manage them. We recommend a three-pronged approach to parental controls as a failsafe in case something goes wrong and your kids stream questionable content until the rooster crows at dawn.
More Articles Like This